Mixer & Metering
Channel faders, VU meters, routing, and output configuration.
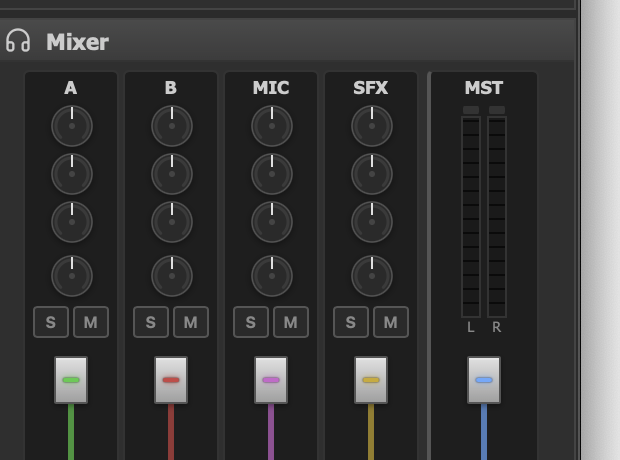
The Mixer panel with vertical faders, stereo VU meters, Solo/Mute buttons, and per-channel EQ for each audio source.
Mixer Panel
The mixer panel sits on the right side of the main window and gives you direct control over every audio source in JaiCast. It follows a traditional channel-strip layout: each source gets its own vertical strip with a fader, stereo meters, and utility buttons.
Channel Strips
There are five channel strips, arranged left to right:
| Channel | Label | Source |
|---|---|---|
| A | Deck A | Primary playback deck |
| B | Deck B | Secondary playback deck |
| MIC | Microphone | Live microphone or voice track input |
| SFX | Sound Effects | Soundboard pad output |
| MST | Master | Final summed output to all destinations |
Each channel strip provides the following controls:
- Vertical fader — drag up or down to set the channel volume. The fader ranges from silence (0.0) to unity gain (1.0). There is no boost above unity.
- VU meter (L/R) — a pair of real-time level indicators flanking the fader, one for the left channel and one for the right.
- Solo (S) — routes this channel to the Cue output in isolation, so you can preview it in your headphones without affecting the main mix.
- Mute (M) — silences the channel in the master bus. The channel continues playing internally (decks do not stop), but no audio passes to the output.
- Pan knob — adjusts the left/right stereo position of the channel using constant-power panning. The range is -1.0 (hard left) to +1.0 (hard right), centered by default at 0.0.
Per-Channel EQ
Each channel strip includes a 3-band equalizer for quick tonal adjustments directly in the mixer, without reaching for the main DSP chain:
- Lo — shelf filter at 200 Hz. Shape the low-end weight of the channel.
- Mid — peak filter at 1 kHz. Control vocal presence and midrange body.
- Hi — shelf filter at 5 kHz. Add or reduce brightness and air.
Each band has a kill switch that instantly mutes that frequency region, useful for live mixing effects or isolating specific frequency content on the fly.
The Master fader controls the final output level after all channels have been summed. Use it to set your overall broadcast level without changing the relative balance between channels.
VU Meters
Every channel strip includes a stereo pair of VU meters that display the signal level in real time. These meters update at 30 Hz, providing a smooth and responsive visual representation of audio activity.
Reading the Meters
- Stereo L/R — each meter independently tracks the left and right channels. A balanced stereo signal will show both bars at roughly equal height.
- Peak hold indicators — a thin line marks the highest peak reached over a configurable hold period, making it easy to spot transient peaks that would otherwise flash by too quickly to read.
- Color zones — the classic color scheme divides the meter into three regions:
- Green — safe operating range, well below clipping.
- Yellow — approaching hot levels. Normal for dynamic peaks.
- Red — at or near 0 dBFS. Sustained red indicates clipping risk.
Meter Styles
JaiCast offers two visual styles for the meters, selectable in settings:
- Segmented LED — a series of discrete blocks that light up in sequence, mimicking traditional hardware LED meters. Each segment represents a fixed dB range.
- Bar — a smooth continuous bar that fills proportionally to the signal level. Cleaner look, easier to read at a glance.
Ballistics
The meter response behavior (ballistics) determines how quickly the meter rises and falls with the audio signal. Two modes are available:
- VU Smooth — averaged response that reflects perceived loudness. Attack and release are smoothed, making the meter easier to read during dynamic material. Good for general mixing.
- PPM (Peak Programme Meter) — fast attack with slow release. The meter jumps to peaks almost instantly and decays slowly, making it ideal for catching transient peaks and protecting against clipping.
Channel Routing
The mixer follows a straightforward summing architecture. All input channels feed into the master bus, and the master bus drives every output destination (speakers, encoders, recording).
Signal Flow
- Deck A and Deck B route directly to the master bus. The crossfader, when active, controls the relative level between the two decks before they reach the master.
- MIC routes to the master bus with automatic ducking. When the microphone is active, deck levels are reduced by a configurable amount (the duck level) so the voice sits clearly on top of the music. See Microphone & Voice for full details.
- SFX routes to the master bus independently. Soundboard output is not affected by ducking, ensuring jingles and effects remain at full level even during a talk break.
- Master sums all of the above and sends the result to the configured Air output device, all connected encoders, and any active recording session.
Audio Device Settings
JaiCast requires at least one audio output device for playback. A second device can optionally be configured for cueing. Audio device settings are found in Settings → Audio Mixer.
| Setting | Description |
|---|---|
| Air Out Device | The primary output device. This is where the master bus audio is sent — typically your soundcard, broadcast console, or speakers. Everything your listeners hear goes through this device. |
| Cue Out Device | A separate headphone output for previewing. When you press Solo on a channel, its audio is routed here instead of (or in addition to) the master. Requires a second audio device or a multi-output soundcard. |
| Sample Rate | The internal processing sample rate. Defaults to 44100 Hz (CD quality). All audio is resampled to this rate at the input stage. |
| Hardware Acceleration | When enabled, offloads certain audio processing tasks to the system's native audio framework for lower latency and reduced CPU usage. |
Right-Click Quick Access
Right-clicking on any VU meter in the mixer panel opens a context menu with quick access to meter display settings. From this menu you can:
- Switch between Segmented LED and Bar meter styles.
- Change the ballistics mode (VU Smooth or PPM).
- Adjust the peak hold duration.
This provides a fast way to tweak the meter display without opening the full settings dialog.